Wednesday, December 29, 2010

2010: A Bacon Odyssey. The Final Chapter

So, today we pulled out the newly pelliclized bacon to finish it off in the final step: smoking.  I'd like to report that it was triumphant and trouble-free and fantastic.  However, that would inaccurate.  In fact, it was major drama and we had to make a major course correction.

First, we do not have a smoker.  I have been assured that as someone with a pretty fantastic grill that a smoker is overkill.  In fact, there are tons of web sites dedicated to using your grill as a smoker.  I would not reject this concept out of hand, since I imagine that someone must be able to do it successfully.  However, that person was not me.  

I followed the steps necessary to use my grill as a smoker, but when Chris showed up very enthusiastically waving a bag of giant hunks of hickory I realized that we would not be able to have them become fully soaked -- they simply were too big.  At this point, I should have tried a plan b.  I did not.

This all seemed fine initially.  However, as I was in the kitchen about half an hour later, I was surprised to hear the dogs barking as I also saw Chris run through the kitchen toward the back yard.  The grill was functioning as a smoker -- perhaps too well, as hickory-scented flames were licking the roof of the grill and sending smoke out in all directions.  

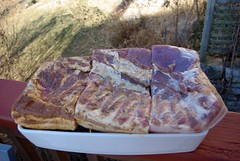
So, a tad chastened, I went to plan b.  Which involved taking the bacon slabs inside, putting them in the oven, and putting them on the type of low heat that they would have been exposed to on the grill.  And, um, they got exposed to the hickory, right?  

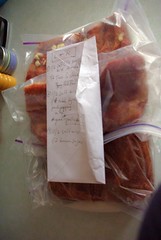
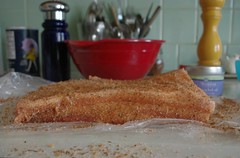
The final results?  Delicious!  Chris and I broke out some apples, a slab of brie, and all three cures.  Surprisingly, the brown sugar/salt-cured mix was probably the best, with the lightest flavor.  A close second was the salt and Two Sisters cure, which also had a great smoky flavor.   

So, the moral of the story:  Even if you almost burn your house down, bacon-making is easy and delicious. Or something.

Tuesday, December 28, 2010

Bacon in Bellefonte II

pel·li·cle (pel-i-kel), n.:
A thin skin or film, such as an organic membrane or liquid film.

So, here's the top view after we completed a crucial step. Today, on day five, I pulled out all of the proto-bacon pieces and washed them. At this stage, though I realize we're several days away, I'd really like to eat one of these. Cures #1 (peppery mix and salt) and #2 (garlic, peppery mix, salt, and sugar) smell absolutely heavenly. Cure #3 (brown sugar and salt), well, smells good, too, but by comparison #1 and #2 are just amazing.

After pulling these out, I put them back in their dish on the improvised drying rack and pop the whole thing back into the fridge. Why? Because the bacon needs to form a pellicle.

The pellicle, a thin film that forms on the bacon as the cure pulls proteins out of the meat and then interacts with the air, is a necessary component of the smoking process. It creates the optimal conditions for smoke to flavor the meat.

So, in 24 hours we'll be smoking! Check back for updates -- and, of course, we'll need some samplers as well.

The Bacon in Bellefonte


IMGP3748
Originally uploaded by Athens Nikita
L-R, cures 1 through 3.

Today, on day five, we have some work to do. However, I feel the need to comment on how the bacon has changed since day one.

For the last five days, I have been pulling the bacon out, massaging it, draining off the liquid that has been pooling in the Ziplock bags, and flipping them. Today is the day that they came out, were washed, and put on racks in the fridge to do something kinda crazy before we can smoke them.

Normally, bacon is a bright pink. You may have noticed, however, that ours is not -- that's because the bright pink color comes from sulfites, which we're not using. At this point the bacon is somewhat smaller than it was before and a darker red -- it has been suffused with the cure and lost a lot of liquid.

The Long and Winding Road to a Reasonable Number of Bathrooms.


new bathroom II
Originally uploaded by Athens Nikita
This is a small, but momentous project which is now at the verge of being done (Done! Done! Imagine chortling and rubbing of hands).

Originally, this big old house had roughly 7 bedrooms and 3 baths -- two on the 231 side (one shower-only on the second floor, one shower-only in the basement) and one miserable, tiny, awful, closet-sized bathroom on the second floor of 233. This, to put it gently, was not ideal. 

Not only did it suck attempting to share one godawful bathroom, but it also made having guests over kind of challenging. In fact, on multiple occasions I've had to guide guests to the second-floor bathroom because the process for getting to it from the first floor requires a Sherpa.

So we upgraded the existing bathroom by combining the bathroom and adjoining tiny bedroom. And then we got started on converting the under-stair closet into a second powder room.

We quickly discovered that we had underbudgeted a bit, and we also discovered that our under-stair closet was originally a staircase to the basement!

The process, which started in mid-November, went something like this:

1. Hire a local contractor to reconfigure the space for our purposes -- this meant ultimately, a lot of complicated work to reconfigure the plumbing and bring plumbing for the first time in history into the "old" (pre-1885) part of the house. And it also meant rebuilding the wall and floor structures to create a box that slopes down to about 6' in height at the back. This ultimately cost about $1,100.

2. Assess and repair plaster/wallpaper wall. We started with the idea of stripping the wallpaper and repairing the wall. But the wall was exceptionally damaged. And in step 3, you'll see why else the original walls weren't really going to get conservator-type treatment. So, ultimately, we did what we had to do, systems-wise, and skim-coated everything. Cost: $200.

3. Call in the electrician to consider fixtures and whatnot. Since the electrician is Chris, this ended up being free. But since the electrician is Chris, this also means that we now have four separately-switched fixtures, including a can fan. And as a bonus, we got a hallway accent light to light up this gloomy alcove. Fixtures and stuff cost about $350.

4. Call back the contractor -- have him install tile floor and grout. Cost: about $350. Have him install sink and toilet and faucet -- about $150 for the toilet, $200 for the sink (special low-profile corner sink), $120 for the faucet.  

5. Paint it! Maybe $60.

6. Install beadboard -- $180.

7. Er, put up the stuff that's still not up. In this case, piddling stuff like towel bars and that last fixture. Fixtures and stuff: $20.

So...let's see...roughly 15 man hours and $2730 later, we now have two bathrooms.  Come visit!

Thursday, December 23, 2010

Bacon! Today's Final Step

Now, the hard part -- sticking the proto-bacon in a bag and stuffing it in the fridge.

See, this is where we basically will do nothing for the bacon for a few days. As the cure leaches into the meat, the meat will lose moisture, which will pool in the bottom of the bag. So each day we will simply remove the bacon from its resting place, drain off the collected moisture, flip the bacon over, and put it back where it belongs in the fridge.

Recipes I've read suggest that at day 5 or 7 you pull out the bacon and ready it for smoking, but I'm still researching that step. So, either December 28th or December 30th, we'll be moving on to the next step.

Meanwhile I've improvised in typical fashion to prepare for the curing process. I can't find my Sharpie, so an envelope with the recipes on it rests on top of the three segments. Beneath that are three 2-gallon freezer bags, each with a piece of meat in it. Beneath that is a turkey roasting rack and the ends of the bags, so that hopefully in between drainings the moisture will pool away from, rather than on, the meat.

Anyway, that's it for now. The whole thing took about 45 minutes. Easy peasy.

Bacon! The Brining Process


Bacon Cure 1
Originally uploaded by Athens Nikita
First, let me say that if you're looking for precision, fussiness, and a bunch of exact measurements for this process, you're looking at the wrong girl. While I can be precise and technical at times, I rarely choose to be for any reason when I'm not doing things that other people would like to be done precisely, like work.

Now, with that parts aside, I'll share this process, which is not at all precise. It goes something like: take your pork belly and slather it with lots of salt and other stuff.

In my case, I am experimenting with three cures in a dry brine, each of which ends up being a mixture of about 3/4ths of a cup.

Bachelor #1 consists of 1/2 salt mix (and that's half Morton's and half hand-ground sea salt) and half Two Sisters Peppery Mix.

Bachelor #2 consists of 3/4ths salt mix, a punch of Peppery Mix, a pinch of sugar, and three cloves of minced garlic.

Bachelor #3 consists of a pinch of hand-ground pepper, 1/3rd cup of salt mix and 1/3rd cup brown sugar.

It's a very complicated process, really. Basically you take whatever it is that you have mixed and rub it all over the meat. And the result is this gorgeous-looking thing you see in the photo.

Stripey, meaty, rainbowy pre-bacon!

Bacon!


Bacon!
Originally uploaded by Athens Nikita
So, this morning I got started on 2010: A Bacon Odyssey

I started by acquiring the bacon-making meat at a place called Nittany Meats, which is a butcher shop in Zion. The guys at Nittany Meats tell me that the pig I bought came from somewhere near Indiana, PA. They stock meat from local and regional sources, but apparently most of the pork comes from Western PA during this season. What I got is called a "pork belly," and is the strip of meat that runs in front of the ribs.

(For the record, "bacon" doesn't have to be pork.  But in this case, and usually, it is.)

The photo is of my ingredients and tools laid out for bacon-making.

Left to right, there's:

1. The dish in which I will be curing everything (I promise to get that back to you soon, Aunt Linda)
2. Morton's Salt
3. Pepper Mill -- when we used the fresh-ground stuff, it's an international mix from Williams-Sonoma.
4. The red mixing bowl in which I mix up the cure.
5. Two Sisters gourmet -- "peppery mix"
6. The salt mill -- about half of the salt used is sea salt that I hand ground.
7. Two knives. I'm embarrassed to admit that my swanky Henckels santuko is awfully dull, and I had to bring in the bonus Cutco knife to finish the job.
8. Paper towels.
9. Freezer-sized Ziplock bags.

As you can see, I've split one pork belly into three slabs. We'll be trying three different cures.

Wednesday, December 22, 2010

Spring Creek Mink


Usually I try to bring some sort of intelligence and order to my thoughts on this blog. But I had to admit that this is so cute that my brain just sort of says "Squee! Mink!"

We fish in Spring Creek regularly when it's a little warmer. In fact, it's a world-class trout stream. And we often bring Nobbler or Edgar along. However, they've been so antsy that we haven't been able to let them explore and now I think I know why: Squee! Mink!

2010: A Bacon Odyssey

So, you might ask, what's this I hear about homemade bacon?

Well, it's almost the holidays. And as a university employee I get a little more time off than the average bear -- in fact, I get about a week off, which gives me time I don't usually have to tackle projects that require more time or diligence.

And we're into local and slow food to the extent that we can work it into our lifestyles. We bought a 1/4th cow from a local farmer this year, and our grass-fed buddy has been nutritious, inexpensive, and delicious. We made beer and it was thirst-quenching and tasty. But we haven't made anything like bacon since...well, we did make gravlax once, but it didn't involve smoking. Now that we have a nice grill and someone who likes to use it, I thought we might try something related.

So...bacon. This afternoon, I'll stop in at a place called Nittany Meats and pick up a 7ish-pound slab of pork belly. And I'll blog it from there -- come back for more info on what happens next.

FTR, there are quite a few fairly good pictorials online detailing the attempts of others to do the same. Here's one.

Monday, December 13, 2010

Merry Victorian Christmas

What's that, you say? Isn't there some giant event associated with my town that happens around now?

Why, yes, there is. Victorian Christmas, which is one of Bellefonte's more major tourism events, happens the 2nd week of December each year. I attended a small part of it last year, which was a somewhat thwarted event due to really awful ice storms. Seriously, I live down the street from one of the craft fair venues, and I could hardly walk there -- I can't even imagine how someone from further afield could manage a visit.

So, this year I actually got to participate to some degree in the festivities. Specifically, I made it to a portion of the craft fair and the house tour. I meant to attend caroling, which last year was a lot of fun despite the weather, but schedules did not permit it.

First impressions:
1. The craft fair is pretty awesome. No, it's not "special" in the sense that it's not a place where you'll find a lot of high-style goods. But there are many, many wonderful small-scale crafts for sale. I particularly enjoyed buying a lot of locally-produced food, including some jam from The Piper's Peck and some awesome organic hand-milled soaps. Just generally: yum. I also saw some nice jewelry and a lot of textile art. Good stuff -- oh, and I only made it to one venue, so I only saw a small sampling of the available options.
2. The victorian house tour is, well, um...I would have preferred some tweaks. First, it's crucial that I note that of the 8 or so houses, 3 of them were worth the price of admission by themselves. The Reynolds Mansion is gorgeous and amazing, The Monsell home was every bit as well-situated as I would have imagined (having looked up at it while stuck in traffic at the light for months now), and the Forge House was not only amazing but very well interpreted. However, there was a ca. 1970 home on the tour (which is, um, not victorian) and there were several homes which were not particularly exemplary but seemed to be included as part of a sales strategy on the part of a local realtor. Note: It's kind of a cool idea to have an open house during Victorian Christmas. What's not cool is pretending that these open houses are part of a house tour which I would imagine most of us are undertaking because we want to see great architecture or learn about local history.
3. While I didn't get to participate, the horse buggy tours appeared to be a ton of fun.

Oh, most importantly, Victorian Christmas is put on by a large host of volunteers. And as far as I could tell it was a ton of fun, and very well executed.

Merry Christmas Every One


merry christmas
Originally uploaded by Athens Nikita
...and especially to my contractor.

Now, I LOVE my contractor. I finally got a chance to inspect stuff, and I am so beyond thrilled with this stupid little door project. Without my telling him how to do it, he reused the door from the laundry that's being displaced, matched the woodwork on the "modern" side and matched the woodwork on the old side, and did the whole thing so that the old hinges were used and the old lock is on our side.

I'm pretty excited about the whole third floor space, actually. Here is the tiny bedroom, which if you'll look at the front of the house is the room in the center of the balcony on the third floor. It's only about 8' wide, and maybe 15' deep. You come up the stairs and it's on the landing. It has a really pretty radiator, too.

Anyway...on to more projects.  Thank you guys for reading.

Tuesday, December 7, 2010

Hard at work lately...


Typical Saturday
Originally uploaded by Athens Nikita
Wow, have we been busy. Tons of small stuff.